Tuesday, May 31, 2011

The Thrill of the Grill

Oh yes, people. It's grill season again. I've been under the radar again, pesky "real" job and other things getting in the way of my blog time, although I do have a few new posts up my sleeve (thanks to "Single Jen(n)s". But given that the weather has finally started to *act* like spring here in the Boston area, and it's been wonderful to grill, I thought it would be more appropriate to talk about grilling.

Grilling is a great way to cook food in a healthy way - you don't need a lot of fat, you can impart flavor without calorie-rich sauces, and you can do a lot of "one dish" meals on the grill. You can spend time in the great outdoors, with or without a cocktail in hand (your choice), and be alone with the grill and your thoughts. To me, this is heaven.

The key to getting enjoyment out of grilling is ensuring that you are prepared. You don't need to have fancy equipment, but you do have to know how to use what you've got. "Flaunt what your mama gave you," as they say. Or, for those of us who lust after super fancy Weber grills but have an aging Kenmore, "Love the one you're with." So here are the main bits that you should prepare to make sure you are making the most of your grilling experience this summer and beyond (oh, yes - I said beyond. There will be a grilled turkey this Thanksgiving!). Mind you, I have a gas grill, so most of this is being written with a bit of a gas grill bias. Yes, I know, there are purists among you who will chide me for not embracing charcoal... but what's the working girl to do? Gas is convenient and cleaner...and it's what I have right now. So - where were we - ah, yes: healthytastyeasy's Grilling Tips!
  1. Most importantly, preheat! You want to heat that grill until it's well over 500 degrees F. You can achieve this by keeping the lid closed with all burners on their highest setting, and it usually takes 10-15 minutes to get there.
  2. Clean and season your grill: The grates clean best when they are hot. Don't let the heat intimidate you from giving the grates a good scrubbin', but don't get burned either. A good grate brush with a long handle should do the trick. Once the grill is nice and hot, brush the grates. After you have taken all the food off of the grill, turn off the burners and (guess what?) brush the grates! Seasoning the grill refers to rubbing the grate with an oil-moistened paper towel, held with tongs, to help encourage a nonstick surface.
  3. Experiment with wood chips: I just bought a stainless steel wood chip smoker - it's a little box that you put your moistened wood chips in (hickory, applewood, whatever floats your boat). Soak the wood chips in water for about half an hour, drain, and put them in the box (or in an aluminum foil tin). Place the chips over one of the burners BEFORE YOU LIGHT THE GRILL and allow the smoke to develop as the grill heats up. The smoke of the wood chips can impart a really nice flavor that's calorie-free.
  4. Try new marinades and dry rubs. Here are just a few of my favorites; mix the marinade in a big zip lock bag and let the meat sit for a few hours or overnight, depending on the strength of the flavor. For steaks, especially the tougher cuts like skirt or flank, pierce the meat in several places so it absorbs the flavors of the marinade:
  • For beef or pork: 1 T. Chili powder (like Penzeys Chili 9000), chipotle powder to taste, 1 T. brown sugar, 1/4 c. low-sodium soy sauce, 12 oz. can Beck's beer
  • For chicken: Juice of 1 lemon; 8 or so fresh basil leaves, cut or torn into strips, 1 T. coarse sea salt, freshly ground black pepper
  • For beef or pork: Chili powder, garlic, maple syrup, 1 T. coarse sea salt, 12 oz. dark beer (like Guinness)
  • For beef or pork: 1 T. dijon mustard, 1 T. brown sugar or maple syrup, 1/4 c. low-sodium soy sauce, 12 oz. Beck's or Duvel beer.
  • Dry-rub variations of the above can be done (for the beef and pork marinades) by mixing the spices, salt and sugar and rubbing it on the meat, then letting it sit, refrigerated, for a few hours or overnight.

Enjoy! More recipes for marinades and grilling, and sides, to follow.

What flavors would you like to see a marinade or dry rub recipe for?

Sunday, May 8, 2011

Shrimp Guaco Tacos


A few weeks ago, a couple of friends and I started a Wednesday night dinner called "Single Jen(n)s' Night" because my one friend Jenn and I both have husbands who are normally gone all week on business travel. Our friend Laurie joins us, even though she's not a Single Jen(n) during the week. Single Jen(n)s' Night is all about taking time to catch up with friends, letting Jenn have some adult company, and giving me an outlet for my blog.

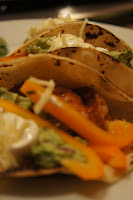
The first of these recipes I tried on my unwitting participants was shrimp tacos. I've decided to call them "Shrimp Guaco Tacos" mainly because "guaco" rhymes with "taco"... but also because the tacos were served with homemade guacamole. So this recipe really has two parts: the tacos and the guacamole.

Make the guacamole first:

Single Jen(n)'s Guacamole
Ingredients:
  • One medium ripe avocado (an avocado is ripe if it gives a bit when you squeeze it. It shouldn't be firm, and it shouldn't be squishy)
  • One lime, sliced in half the "short way" across the center
  • Fresh cilantro, about 1/4 cup, chopped
  • 1/4 of a small red onion, finely minced
  • One small tomato, seeds removed, diced
  • Salt and pepper to taste
  1. First, get the avocado flesh into a medium mixing bowl: Using a sharp chef's knife (and a lot of caution!), slice the avocado in half around the pit. Holding the avocado with both hands, twist and lift one half until it separates from the other half. The pit will remain in one half. Take the half with the pit in one hand and, with your other hand, use the blade chef's knife to whack into the pit. Twist a quarter turn, and the pit should loosen from the avocado. Now use a spoon to scoop the flesh from the avocado into the mixing bowl. Great job!
  2. Using a citrus reamer (or a fork), squeeze the juice from one of the lime halves over the avocado. Add a pinch of salt and some pepper, and mash the avocado with a fork. You don't want it to get too smooth, but you also don't want too many lumps.
  3. Add the onions, tomatoes, and cilantro to the avocado, and blend with the fork. Taste and see whether you need to add more lime juice, salt or pepper.
  4. Enjoy! Serves about four (or one, if you really, really, really like guacamole...like I do!)

Shrimp Guaco Tacos
Ingredients:
  • One pound of medium or large raw shrimp (go ahead, use jumbo or colossal if you want!), peeled and de-veined (thawed if frozen)
  • About 1 T. of Chili powder (Penzeys Spices Chili 9000 is my favorite!)
  • About 1 t. of minced garlic (fresh or dehydrated both work well)
  • Salt and pepper to taste
  • One half of a fresh lime
  • One Bell pepper, sliced into strips (I like to use yellow or orange for color)
  • Cooking spray
  • 1 package of small (6") corn tortillas (usually 12 per package). Corn tortillas have a much lower glycemic index than flour tortillas, more fiber, and fewer calories. Usually they are only about 120 calories for 2 tortillas. Use flour if you prefer!
  • Single Jen(n)'s Guacamole
  • Salsa of your choice
  • Shredded reduced fat cheddar cheese and reduced fat sour cream if you'd like
  • Fresh cilantro
  1. Ensure that the shrimp have been rinsed and patted dry. Sprinkle with salt and pepper and add the chili powder and garlic, then allow to marinate for about an hour.
  2. Heat a skillet or frying pan over medium high heat, then spray with cooking spray. Add the pepper strips, stirring frequently, until they begin to soften. Keep the peppers in the pan, moving them to the edge so that there is enough space in the center of the pan to put the shrimp.
  3. Spray the pan with more cooking spray if necessary. Add the shrimp. Cook for about 2 minutes, then turn the shrimp over to cook on the other side. They should not cook for more than about 4-5 minutes total.
  4. While the shrimp cook, if you have a gas stove, then you can do this neat trick with the corn tortillas that makes them a bit more pliable and less likely to crack in the middle. Turn on a burner to about medium. **USING TONGS**, place a tortilla directly on the burner. After about 10 seconds, AGAIN using tongs, turn the tortilla over. Do this repeatedly until the tortilla is a little bit blackened, and warmed all the way through. Be sure not to leave the tortillas unattended, they can catch fire (and have in my presence!).
  5. Once they've finished cooking, give the shrimp and peppers a good stir to ensure they are well seasoned. Squeeze the lime over the shrimp and peppers, and stir to distribute the lime juice.
  6. Each serving is 2-3 tacos: each taco is a tortilla with a scoop of the shrimp and pepper mixture, topped with a bit of guac, salsa, and if you would like, sour cream and cheese. Fresh cilantro is another nice touch.
  7. Enjoy!

She's baaaaaack!

OK, so it's been a while since I've posted. Nearly two months, as a matter of fact.

For the handful of you who grew addicted to my entries, I'm sorry that my absence has been so long. I lost my grandmother about a week after my last post, and suffice it to say that I've not really felt "inspired" for a while. Despite that, I did manage a couple of recipes that I tested on friends - and took pictures - so I'm going to try and get caught up.

Gram was a huge source of inspiration to me - she exhibited a passion for living and having fun that has made a big contribution to who I am today. So in her honor, I'm getting back to something that feel passionate about.

Here we go!